THE MODULES

Firstly, why use modules? I decided to use modules for two reasons: portability and the ability to turn a module on its back and sit on a stool and work on point motors, wiring, etc. I will talk and show more about this in a later post.
The modules for BORENORE are made from Capral 25mm square aluminum tube and Capral Qubelok Joiners.
A similar product can be purchased from the big green warehouse, but it is much cheaper to use the Capral (Australian) product. Capral sell the tube in 6m lengths but will usually cut it in half or thirds to facilitate transport. I am not sure if they do “cut to size” but they do charge per cut. You could probably buy a cheap drop saw for the same price. However, you will need to have say a 64-tooth blade to cut the aluminum tube. These usually cost as much as the drop saw itself.
I first saw a module built using these products in a tutorial by an innovative narrow-gauge Victorian modeler named Mario Rapenitt.
There are other examples on the internet. If my memory serves me well, I think Keiran Ryan drew one up for his website once, but I thought it was a bit over engineered and expensive.
The BORENORE modules are based on a basic 1200mm x 600mm x 150mm “box” frame. I chose this size because it suited MY needs, but you can build them any size you want; although I would think 1800 mm long would be the practical limit. The 150 mm depth provides the necessary clearance for point “motors” etc. These 1200mm long modules are extremely light in weight. The home installation has corner modules which are based on a 900mm L Shaped Module but for exhibition there will be 1200mm return modules using 3D printed 45-degree joiners printed for me by Keiran Ryan of KRM. These modules will be discussed in a future post.
The modules are joined using 18mm 7 ply inserts in the ends. You can also put the “end plates” in the side of a module if that is what you need.
This is where the Capral product range comes into its own. They produce an extruded tube with a “Lip” on one side. I use this “Lip” to help locate and secure the end plates. Clip from Queblok PDF.

The end plates are held in place by Zenith 8G x 15mm Gold Passivated Button Head Timber Stitching Screws - 40 Pack

from behind using the Lip to hold them in place. I also use the same screws for securing the ply deck.
The modules are aligned using DCC Concepts
Legacy Models PowerPoint Baseboard Dowels (4-pack).

These are not cheap, but they work for me. DCC Concepts also sell alignment dowels without the electrical contacts. The wiring on the show modules is quite simple so an alignment dowel that also acts to carry the power bus is perfect. The modules are then held together using furniture bolts and T-nuts. Yes, no washers to get lost.
The modules are topped with 7mm 5-ply which I do buy from the big green warehouse in 900mm x 600mm sheets, it is simply easy that way. The scenery base is 20mm thick extruded polystyrene sheet.
Tools needed.
A drop saw for cutting the aluminum tube and other jobs.
64 tooth blade.
A Table saw or similar for cutting the various pieces of ply.
A two-speed battery drill/driver.
3mm, 6mm and 7.5mm drill bits.
13mm and 19mm spade bits.
A soft face hammer.
Steel rules and squares, various markers.


Bill of Materials for 1200mm x 600mm x 150mm Module.
4 x 575mm long 25 mm square aluminum tube
6 x 550mm long 25 mm square aluminum tube
4 x 550mm long 25 mm square aluminum tube with Lip
4 x 100mm long 25 mm square aluminum tube with Lip
2 x 100mm long 25 mm square aluminum tube
8 x 3-way Qubelok joiners
4 x 4-way Qubelok joiners
2 x sheets of 7mm ply 900mm x 600mm
2 x end plates, 550mm x 100mm x 18mm 7 ply.
2 x alignment/power dowels.
2 x M6 T-nuts
2 x M6 x 50mm Furniture Bolts
18 x 15mm 8G button headed screws.
Suitable Extruded polystyrene foam for scenery base and landscaping.
3 mm MDF for Facias and Backdrops.

All the components laid out ready for assembly. Including the 7 mm 5 ply deck and 20 mm extruded polystyrene board.


The end tubes showing the “Lip”.

All the Lips need to be cut at 45-degree angles to provide clearance when assembled.
Design Tip:
Before you design each module firstly draw up the track plan on some butcher’s paper to see where any points may interfere with the framework. It may be necessary to move the centre beam or slightly adjust the track plan so points do not coincide with framework. All of my modules are slightly asymmetric simply to assist in marking out and cutting the tube.
Assembling the basic frame.
Nothing could be simpler. Layout the frame “plan”.
Hammer the joiners into the tube.
Fit Risers. Build a top frame.
Add the Top Frame to the base.

Photo1 End Frame Layout
Photo 2 End Frame ready to knock together.

Photo 3 Finished End Frame and set up for Centre Frame.

Photo 4 Two End Frames

Photo 5 Assembled Centre Frame

Photo 6 Final Assemble Layout

Photo 7 More Progress

Photo 8 Frame Almost Complete.

Photo 9 Completed Frame
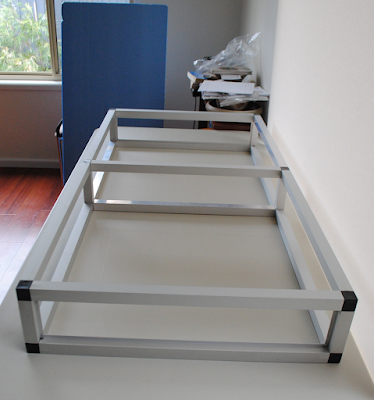
Photo 10 A different View

Photo 11 7mm ply laid out.

Photo 12 Ply in final position

Photo 13 Extruded Polystyrene Foam in position.
In the next post I will discuss the End Plates.
Cheers Phil Collins

.jpg)
No comments:
Post a Comment